
Welcome to UltiSend
Congratulations - you've successfully installed the ultimate mailer tool - UltiSend. Once you're tried mailing the UltiSend way, you won't ever want to be without it - we're that confident!
Mailing with UltiSend as your smart assistant you'll not only mail faster and more efficiently, you'll automatically know all your open rates for all your mailers - invaluable. We know some mailers give you those stats for their own mailer but with UltiSend/ViralMailProfits, you'll have the open rates for all your mailers and all your mails on one page!
UltiSend will keep track of when mailers are due to mail, how many credits you have and what the open rate has been for that mailer - that will give you such an advantage and save you so much time. It can even tell you which mailers you need to be earning more credits for!
In conjunction with your ViralMailProfits account, UltiSend will:
- Let you mail every one of your mailers on time, every time and with ultimate ease
- Automatically customise your emails to each mailer (no more storing multiple templates or editing emails after you've copy/pasted)
- Automatically create tracking links (so you know your open rates for all mailers)
- Above all, let you do all your mailing sooooo quickly!
Although using UltiSend is different from the way you normally mail, it is very easy to get used to and very quick to use once you do!
Because it's different, we do highly recommend you actually read this page and watch the 2 minute video below so that you understand how it's used, what it can do and why it makes mailing so fast. Once you've done that, learning how to use it will be easy.
Note that although the video shows using UltiSend from the perspective of someone that has been using UltiSend for a while and already has templates defined, even a new user will quickly be this fast! Note also that it takes nowhere near 2 minutes to do all this - the video is only 2 minutes long to have time for all the captions to be read.
Getting Started
Getting started depends on whether you already use ViralMailProfits and now want to work even easier or if you're totally new.
Totally New to ViralMailProfits
Do you have some kind of system for knowing which mailers will be ready to mail when or do you just log in to each one hoping?
Do you have a 'library' of emails stored in e.g. notepad or Word that you use to copy and paste into your mailers?
Here's an overview of how to get started with UltiSend if you've never used ViralMailProfits before. You have no templates set up and no mailers defined.
In whatever browser you use, started by opening a new tab/window and logging into ViralMailProfits. You must be logged into VMP to use UltiSend.
Now go to the first mailer you think of that might or should be ready to mail. As soon as you do, UltiSend will pop up and say "this is a mailer and you don't have it in your account, do you want to add it now?". Say yes and UltiSend will prompt you with a couple of steps to complete the process and then that's it - that mailer is now ready to use. If you're on the login page, it will also ask if you want to auto-login to this mailer in future. If you say yes, you'll need (at some point) to go to ViralMailProfits and enter your username and password for the mailer.
Now log in and go to the send page like you normally would. You'll see some differences now that UltiSend is assisting you.
Firstly, there will be one of two UltiSend panels open - it should be titled 'Send Options'. If it's not, click on the open envelope icon. Secondly, there are coloured borders around the linked fields. These are not important but they remind you that UltiSend is connected to those fields. With some mailers, the colored border may not appear despite everything being linked.
Now enter your email and the associated fields just as you would normally. Enter your subject, email body (with a link in if required), enter the credits you want to use (if applicable) and the URL you're promoting in the URL/link field (again, if applicable - though you must have your URL either in the url field or the body of the email).
Nearly ready. On the UltiSend panel it should now be saying this mail will be sent to x members where x is the number of credits you entered. That is the default mode. If it's not the correct number of mailers, click the 'if this is wrong click here' link on the UltiSend panel and use one of the 3 options that best suits that mailer.
Hit 'send with UltiSend' and watch the progress bar.
After a few seconds, you'll be prompted to either send now, send manually or cancel. For your first email you should choose send manually. That way you'll see what UltiSend has done. See this help page (opens in new window) for more details about what UltiSend has done.
Note if this is your first time, don't be alarmed that your link has been changed - this is your unique tracking link for this email.
When you're happy, press the mailer send button (this isn't normally necessary except where you choose to send manually)
Existing ViralMailProfits Users
Follow the above procedure except...
Click on the clock icon to find which of your mailers are ready to mail.
You'll see a table. The main columns are sortable - just click on the heading to sort ascending or descending.
See how useful it is to be able to see credits and CTR% when choosing your mailers?
Click on the green 'go' button to go straight to that mailer.
Top Tip
Although they look like buttons, they behave like regular links. Click normally and the mailer will open in the current tab.
But you can hold ctrl while you click to open them in a new tab. That means that you can easily open 2,3,4 or more mailers in new tabs so they're loaded when you're ready to get to them. You may find this suits the way you work or not - your choice.
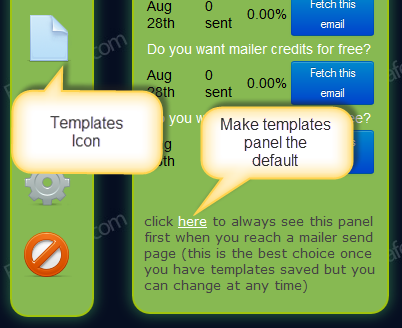 When you first go to the send page, click on the
piece of paper icon (templates).
When you first go to the send page, click on the
piece of paper icon (templates).
Because you already have templates saved, you will normally want this panel to show first when you go to a new send page.
Look near the bottom of the 'Your Templates' panel and see the link shown left.
Click and the templates panel will always show first when you go to a send page.
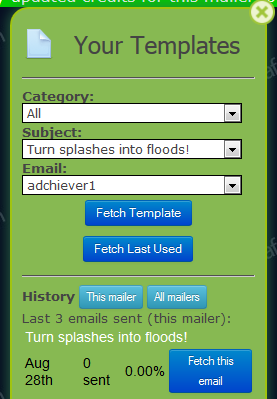 Now you're ready to choose your template.
If your templates are already sorted into categories, choose the category from the top dropdown box.
Pick your subject line and email body from the appropriate dropdown boxes.
When you've found your template, click fetch template. Note the panel will change to the send options panel automatically.
Of course, as you'd expect, we don't expect you to do that every time - if there's a way to cut out steps, we've done it!
Often you'll be using the same template several times in a row. If so, you can use the 'Fetch Last Used' button to make life even easier for yourself.
You'll also notice a section on the Your Templates panel called history. By default, the history is showing you the last 3 emails you sent through this mailer and their CTR (click through rate). You can review those stats and choose to fetch one of those 3 templates if you wish.
Alternatively, click on the All mailers button to see the top 3 performing emails across all mailers.
After you've fetched your template, the remaining steps are the same as described for new members.
Top Tip
Some of your templates will be stored as plain text, some may contain HTML. In the templates list, HTML templates will be obvious (they're in red and say [html] after them). Normally you'd fetch a HTML template into a HTML editor. If you try to paste nicely formatted text into a HTML editor, the HTML editor usually gets rid of all your blank lines.
With UltiSend, you can fetch a text template into a HTML editor and UltiSend will turn the text into HTML that preserves your plain text formatting such as line breaks.